
by Suraj Francis
Lighting Designer & Founder of The Lighting Blog
When it comes to joinery, lighting is not just functional — it’s the details that can elevate the entire space. Whether it’s a luxurious walk-in wardrobe, a sleek bar counter, or a built-in bookshelf, the right lighting can add depth, mood, and intention to every surface.
But here’s the truth: if you haven’t considered a few critical details before installing lights, you’re likely missing out on the full potential of your design.
As someone who’s worked on bespoke hospitality and residential projects across the Middle East and Asia, I’ve seen firsthand what works — and what falls short. So here’s a breakdown of the most important things to think about when lighting your joinery.
- Understand the Type of Lighting: Start by defining your purpose. Are you lighting to see (task), to set mood (ambient), or to highlight (accent)? Each type plays a distinct role. For joinery, accent lighting is often the hero — but combining it with functional layers is the real secret.
- Placement Is Key: Even the best fixture can lose its impact if it’s installed in the wrong spot. Want to highlight an object or add dimension to a cabinet? It’s all about strategic positioning — even a few centimeters make a big difference.
- Choose the Right Color Temperature: Warm whites (2700K–3000K) create an inviting and cozy feel — perfect for living areas or display units. Cooler whites (4000K+) feel clean and modern — great for sleek kitchens or wardrobes.
But here’s the catch: the material and color of the joinery will reflect the light differently. Test before you fix. - Always Include Dimming Options: Lighting that’s stuck at full brightness is limiting. Adding dimming control gives you mood flexibility, and more importantly, makes the space feel thoughtfully designed.
- Direction Tells a Story:Where the light comes from matters.Downlighting adds clarity.Uplighting creates drama.Backlighting adds elegance and a sense of depth. Think about the atmosphere you want to create — then choose the direction that tells that story.
- Energy Efficiency Matters: LED lighting has made it easy to design creatively without compromising on efficiency. Go for low-wattage, high-output LEDs that are built to last — especially in concealed or hard-to-reach joinery.
- Don’t Overlook Safety: It’s not talked about enough, but fire safety and heat management are crucial in joinery lighting. Always use certified products and proper installation techniques — especially when lighting inside cabinetry or enclosed spaces.
By considering these factors, you will be able to create a lighting scheme that is both functional and visually appealing. It’s always a good idea to consult with a professional lighting designer to ensure that your joinery lighting is installed correctly and effectively.
Joinery Lighting Guide — How to Think Like a Designer
Before starting any joinery lighting design, ask yourself:
What do I want to highlight — the joinery itself or the items displayed inside it?
Is the joinery dark or light in color? Glossy or matte?
How will the lights be controlled — on/off switch or dimming system?
These small decisions define the overall outcome.
Layered Lighting = Balanced Design
Combining different light layers gives the best effect:
Use LED strips to softly illuminate shelves and compartments
Add small spotlights or downlights to highlight the form and frame
Use contrasting color temperatures for the items vs. the joinery for visual depth
Even the most beautiful reference image might not match your actual result — because factors like ceiling height, surface texture, and natural light vary in every space. That’s why on-site mockups and adjustments are so important.
Questions You Should Answer Before Choosing Joinery Lighting
What is the color of your joinery?
What is the material/finish — matte or glossy?
How will you control the lighting? Is it just a basic switch or dimmable via a smart system?
By considering these factors, you can avoid common mistakes and create a lighting scheme that will illuminate your joinery perfectly. It’s always best to consult with a professional lighting designer to ensure that your joinery lighting is installed correctly and effectively.John Cullen Lighting is indeed a highly recommended company in the luxury residential lighting industry and is well-known for their expertise in joinery lighting.
Keep in mind that luxury residential lighting can be quite expensive, but the investment can pay off in the long run by creating a beautiful and functional space. It’s always best to consult with a professional lighting designer to ensure that your joinery lighting is installed correctly and effectively.
Choose brighter lights for dark finish and less bright lights for white or light color joinery. It’s also important to choose correct color temperature for the lights using. If your joinery is dark color then you need to choose more warm white color lights ( 3000k to 3500k color temp- CCT) and joinery is white or light color- then better to use warm color lights (2500k to 3000k CCT)
Matt finish is the suitable material for joinery. If it’s glossy finished joinery, there are chances to get reflection of lights from the surface which will cause glare. You need to make sure there won’t be any glare from lights on the joinery. I have shared some joinery details below to avoid glare.
Choose 5watts per meter strip lights or 1 watts spotlights when your lights are control with non dim – normal switch. If you have dimming controls for your joinery, use 9watts/m for strips and higher watts for spot lights. I suggest to use dimming for all of your joinery’s. This will give you the flexibility to set precise brightness and mood.
And don’t forget, there’s no rule that says you can’t combine both techniques in one space. How you use the shelves and what you want to display should dictate how you light them.
Types of most common aluminum profiles for LED lights used in joinery

Joinery lighting option 1


Option 1 – Back lighting
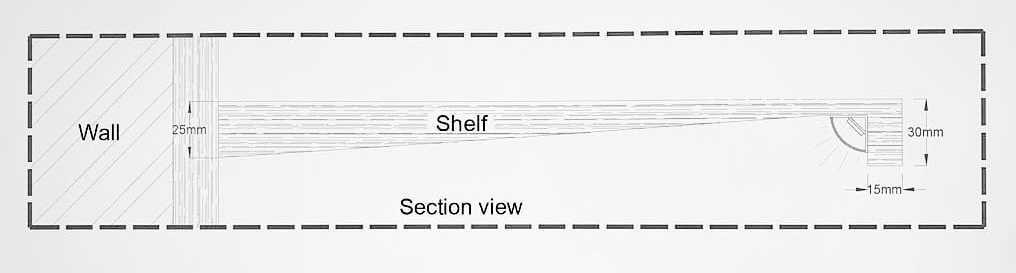
This option is my personal favorite and effective way to light joinery. We need to make sure the surface at wall should be matt finish to get this option effective. Led profile here is recessed inside floating shelf supported from sides.
In this option display items on the joinery are not highlighted. If you want to highlight, then need to add adjustable downlights in front of joinery or mini spotlights within the shelfs.
Joinery lighting option 2


Option 2 – Back lighting
In this option 2 line of strips used to get the effect of up and down light washing at the backside of joinery. This will also have similar effect to the option 1 above but this detail will give more wash of light to joinery wall. Make sure led profile not touching joinery wall. 5mm to 10mm offset gap from wall will help to get smooth gradient for light wash and also helps to reduce harsh light wash at the area closer to luminaire.
In this option display items on the joinery are not highlighted. If you want to highlight, then need to add adjustable downlights in front of joinery or mini spotlights within the shelfs.
Joinery lighting option 3

Option 3 – TLB Split lighting
This detail is designed by me (Owner of ‘The Lighting blog’ and lighting designer by profession). 1 single line of strip light from front can highlight both top and bottom part of shelf. This also have added advantage to highlight display items and the joinery itself. As shown in the details, the thickness of shelf at back are smaller than the front part where lights are installed which can help to avoid shadows at the back wall of joinery.
Option 4 – Front lighting – Down

Joinery lighting option 4


This is a standard option for joinery lighting. But it’s very easy and cheap to built. Only disadvantage will be the joinery looks bulky from the front as it have a 40mm thick at front. This lighting is suitable for library or similar usage.
Option 5 – Front lighting up

Joinery lighting option 5
This is a standard option for joinery lighting similar to option 4 – but light washing upward. Advantage for this option is it’s very easy and cheap to built. Disadvantage is the joinery looks bulky from the front as it have a 40mm thick at front.
Option 6 – Front lighting down without shadows
This is a standard option for joinery lighting similar to option 4 – but light washing downward. Advantage for this option is that, it wont create any shadows and it’s very easy and cheap to built.
Some of the common mistakes that usually seen when installing joinery lights are shown below.

You can see light dots visible slightly on the joinery. This happens because LED strips are installed without diffuser & profile. Ideally we need a uniform diffused lighting for joinery, so always try to use lighting with diffuser & profile. To avoid harsh spot at the sides of the joinery – trim down approx 20mm to 35mm from either end of the light if its close to any wall. We can avoid the shadows and the harsh light visible at the sides of joinery in an angle by using the detail from TLB split lighting details Option 3 from above.

If you want to avoid harsh angled light with shadows visible at the back and sides of above joinery, Use joinery lighting detail Option 6 from above.

To avoid harsh spot at the sides of the joinery – trim down approx. 20mm to 35mm from either end of the light if its close to any wall. Also try to add different layers of lights to create more drama to joinery.
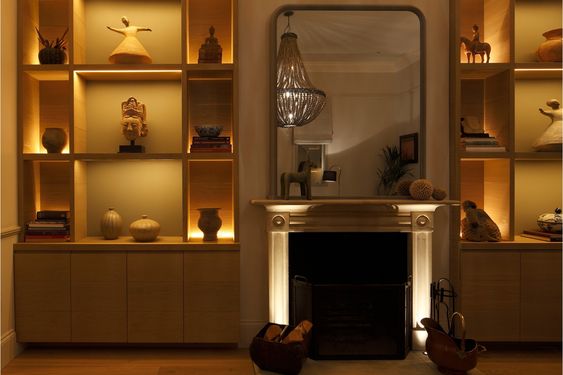
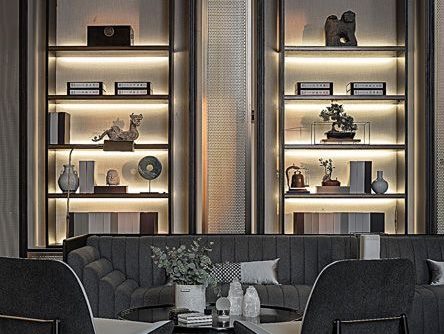
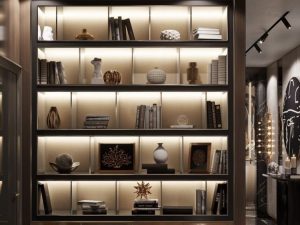
Some Good Joinery lighting reference images from John Cullen Lighting

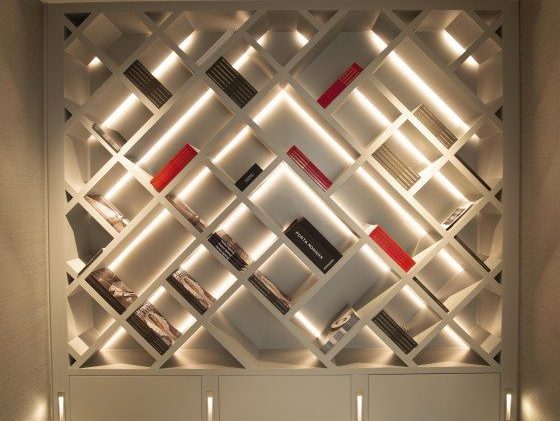
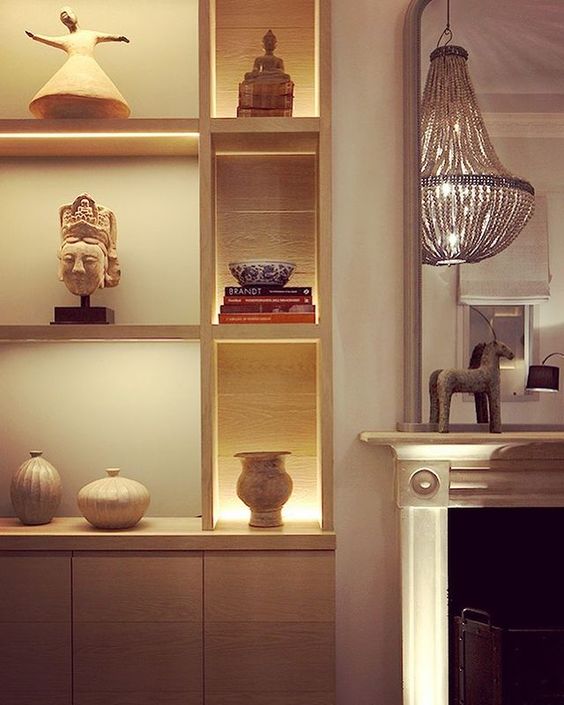


If you’re aiming for luxury results, consulting a professional lighting designer is always worth it. At John Cullen Lighting, where I currently lead lighting design projects, joinery lighting is treated as a craft — not a checklist. With the right design and execution, it truly becomes a highlight of the interior.
Thanks for reading,
Know someone who could use this insight? Share this blog with them — it might just light up their next project.


One of the great ideas you shared. I loved it.
LikeLike
So many new things I have learned reading this post about energy efficiency and energy-saving. Amazing post. Glad I found it. Thank you so much.
LikeLike
Interesting article. I suggest that a CRI >90 also be considered
LikeLike
You mean something like that?
https://aiuredeco.com/en/small-downlight-led-shot-light.html
LikeLike